 Photo by
 Using SaltStack for internal SSL certificates
SaltStack has a state module for managing x509 certificate files, making it much easier to create SSL certificates for encrypting internal traffic. Managing certificates can be difficult however, and the state module often gives poor feedback when an error occurs.
In this post I’ll walk through the process of signing your own certificates and give some useful tips along the way.
Example architecture
We will use 3 machines running Debian Stretch:
ca.example.local will run a private certificate authority.
It has a self-signed root certificate that it uses to issue other certificates.
Using the x509 Salt states, other minions can request new certificates signed by this root certificate.
Because this root certificate is self-signed, it needs to be explicitly trusted by the other machines for the issued certificates to be considered valid.
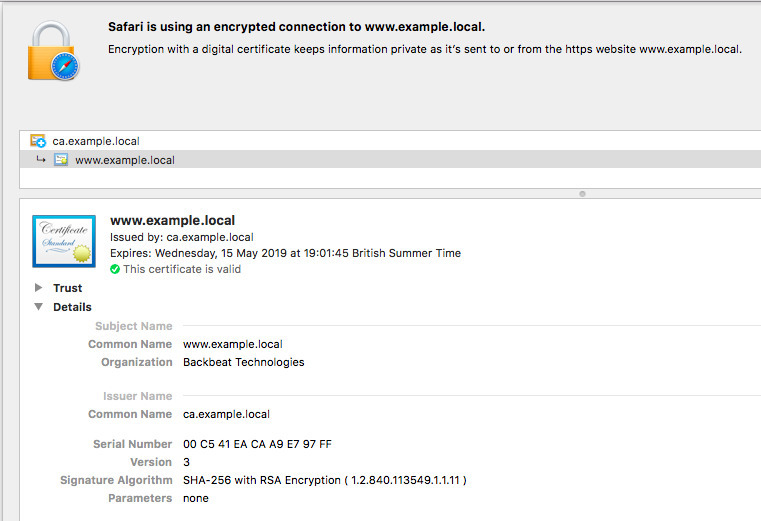
www.example.local will run Nginx over https, encrypting traffic with a certificate signed by the internal certificate authority.
Finally, salt.example.local will run the Salt master and provision the other 2 machines.
Bootstrapping
Make sure you have the 3 machines running and talking with the Salt master, then create a top file and base state for the ca and www minions:
# salt/top.sls
base:
  '*':
    - base
  'ca.example.local':
    - ca
  'www.example.local':
    - www
# salt/base.sls
salt_x509_module:
pkg.installed:
- name: python-m2crypto
- reload_modules: True
file.directory:
- name: /etc/pki/
- mode: 0600In base.sls we install m2crypto package installed (required by the x509 state module) and create a folder to store certificates.
Top tips
- Using
reload_modules: Truemakes the x509 module available in the same state run after installing the required package.
Creating the certificate authority
ca.sls creates the root certificate.
# salt/ca.sls
ca_certs_dir:
  file.directory:
    - name: /etc/pki/issued_certs
    - mode: 0600
    - require:
      - file: salt_x509_module
      - pkg: salt_x509_module

ca_signing_key:
  x509.private_key_managed:
    - name: /etc/pki/ca.key
    - bits: 4096
    - require:
      - file: ca_certs_dir

ca_root_cert:
  x509.certificate_managed:
    - name: /etc/pki/ca.crt
    - signing_private_key: /etc/pki/ca.key
    - CN: {{grains['id']}}
    - basicConstraints: "critical CA:true"
    - keyUsage: "critical cRLSign, keyCertSign"
    - subjectKeyIdentifier: hash
    - authorityKeyIdentifier: keyid,issuer:always
    - days_valid: 365
    - days_remaining: 0
    # option to generate the private key for you
    # - managed_private_key:
    #     name: /etc/pki/ca.key
    #     bits: 4096
    - require:
      - x509: ca_signing_key
First we generate the private key /etc/pki/ca.key with the x509.private_key_managed function, then use that key to create the self signed certificate /etc/pki/ca.crt.
Top tips
- The x509 module can create the private key for you with the
managed_private_keyoption, but at the time of writing it doesn’t seem to work with Salt Fluorine (2019.2.0). Instead we generate the private key explicitly first. - You must include
CA:trueinbasicConstraints. - You must include
keyCertSigninkeyUsageto be able to sign other certificates. - The common name
CNcan be anything you like, but should be easy to recognise. We’ve gone forgrains['id'], i.e.ca.example.local. - You can add extra information to the certificate, e.g.
Cfor country orOfor organisation, but it isn’t required. days_remainingis set to0to disable automatic renewal by the x509 module. We don’t want the root certificate to be automatically recreated, invalidating all of our existing certificates.
Trusting the root certificate on other machines
The new root certificate is self-signed and therefore not trusted by the machines, including the ca server itself.
We can verify this with openssl on the ca machine:
root@ca:/etc/pki# openssl verify ca.crt
CN = ca.example.local
error 18 at 0 depth lookup: self signed certificate
error ca.crt: verification failed
We’ll use the Salt mine to send the certificate to every machine and mark it as trusted.
At the bottom of ca.sls, add a state to publish the certificate to the mine:
# salt/ca.sls
ca_publish_public_root:
  # This is deprecated `module.run` syntax, to be changed in Salt Sodium.
  module.run:
    - name: mine.send
    - func: x509.get_pem_entries
    - kwargs:
        glob_path: /etc/pki/ca.crt
    - onchanges:
      - x509: ca_root_cert
Now whenever the root certificate is created or changed, it’ll be sent to the mine.
At the bottom of base.sls, fetch the certificate from the mine and use update-ca-certificates to trust it in the system:
# salt/base.sls
internal_ca:
  file.directory:
    - name: /usr/local/share/ca-certificates
  x509.pem_managed:
    - name: /usr/local/share/ca-certificates/salt-ca.crt
    - text: {{ salt['mine.get']('ca.*', 'x509.get_pem_entries')['ca.example.local']['/etc/pki/ca.crt']|replace('\n', '') }}
  cmd.run:
    - name: 'update-ca-certificates --fresh'
    - onchanges:
      - x509: internal_ca
Top tips
- Don’t publish the private signing key to the mine, just the certificate. A private key should never leave the machine it is created on.
- You don’t need to have
x509.get_pem_entriesadded tomine_functionsto call it as a one-off in a state. - You can use globbing to make the
mine.getcall ('ca.*'), but can’t use it in a key for the returned mine dictionary (use'ca.example.local'instead). It might take creative jinja usage to figure out the dictionary key in a dynamic environment.
Allowing other minions to request certificates
Using the Salt peer runner we’ll allow www to call the x509.sign_remote_certificate function on ca.
Update the salt master configuration to allow this:
# /etc/salt/master
# Allow minions to execute selected functions on other minions
peer:
  www.*:
    # Sign a certificate with another minion that has a signing certificate.
    # The requesting minion must also be granted access in a signing
    # policy on the minion with the certificate.
    - x509.sign_remote_certificate
This grants www permission to run the function on ca, but not to sign a certificate.
We need to create a certificte signing policy on ca for that.
Add the signing policy in ca.sls:
# salt/ca.sls
ca_signing_policies:
  file.managed:
    - name: /etc/salt/minion.d/signing_policies.conf
    - source: salt://signing_policies.conf
  service.running:
    - name: salt-minion
    # restart the salt_minion when the file changes
    - listen:
      - file: salt_minion
# salt/signing_policies.conf
x509_signing_policies:
internal:
- minions: 'www.*'
- signing_private_key: /etc/pki/salt-ca.key
- signing_cert: /etc/pki/salt-ca.crt
- basicConstraints: "critical CA:false"
- keyUsage: "critical keyEncipherment"
- subjectKeyIdentifier: hash
- authorityKeyIdentifier: keyid,issuer:always
- O: 'Backbeat Technologies'
- copypath: /etc/pki/issued_certs/Top tips
- We’re only allowing certain types of certificates to be issued.
CA:falseinbasicConstraintsand settingkeyUsageensures minions can’t receive signing certificates of their own. minions: 'www.*'restricts this policy to thewwwminion. No other minions can request certificates.- We’re using
copypathto keep a log of the certificates we’ve issued. - Don’t forget to restart the salt-master when you change its configuration (ideally using a Salt state).
Requesting a certificate
With the root certificate trusted on every machine and signing policies established, lets provision the www machine with a certificate signed by the internal CA.
We’ll also append the root certificate to the new certificate to form a chain of trust.
The new certificate won’t have to be explicitly trusted by all the machines because the certificate that issued it (the internal root certificate) is trusted already.
# salt/www.sls

key:
  x509.private_key_managed:
    - name: /etc/pki/www.key
    - bits: 4096

cert:
  x509.certificate_managed:
    - name: /etc/pki/www.crt
    # must match the minion id exactly
    - ca_server: 'ca.example.local'
    # matches the signing_policy created on the ca machine
    - signing_policy: internal
    # the public key will be automatically derived from the public key, no need to create it
    - public_key: /etc/pki/www.key
    # common name
    - CN: www.example.local
    # create a chain of trust by appending the internal root cert
    - append_certs:
        - /usr/local/share/ca-certificates/ca.crt
    # required or the state will fail
    - subjectAltName: 'DNS:www2.example.local, IP:192.168.80.3'
    - days_valid: 30
    # how long to wait before recreating the certificate
    - days_remaining: 10
    # check the new certificate is valid and trusted (requires the internal ca to be installed)
    - check_cmd:
        - 'openssl verify /etc/pki/www.crt'

nginx:
  pkg.installed:
    - name: nginx
  file.managed:
    - name: /etc/nginx/conf.d/default.conf
    - source: salt://nginx.conf
  service.running:
    - name: nginx
    # restart when the config or certificate changes
    - listen:
      - file: nginx
      - x509: cert
Here we see the real power of x509.certificate.managed.
We don’t need to worry about CSRs or public keys as they’re generated and handled automatically.
Top tips
- Again we’re avoiding usage of
managed_private_keyand creating the private key explicitly. - Your certificate should have a Common Name (CN) that matches the service host -
www.example.localin our example. An IP address is also OK if that’s how you’ll access the service. - This state will fail if you don’t provide a
subjectAltName. If you don’t need an alternative name, useRID:1.2.3.4. See SaltStack issue #51869. - If you do need an alternative name, use
DNS:for a hostname andIP:for an IP address. Separate multiple entries with a comma. - Any options passed to
x509.certificate_managedthat are already present in the signing policy will be ignored. For example, if the signing policy included- O: 'Backbeat Technologies'and we requested- O: 'Rogue Company', we’d get a certificate with Backbeat Technologies as the organisation. - Run
openssl verifyas acheck_cmdto ensure the created certificate is valid. - Use
listenin the nginx state to restart the server when the certificate changes.
Here’s a basic nginx configuration to use with file.managed:
server {
    listen 443 ssl;

    root /usr/share/nginx/html;
    index index.html index.htm;

    ssl_certificate /etc/pki/www.crt;
    ssl_certificate_key /etc/pki/www.key;

    location / {
        try_files $uri $uri/ =404;
    }
}
Testing it out
Highstate the machines!
salt \* state.apply
Then use curl to check the web server is running with a valid certficate.
curl -I https://www.example.local
If you import the root certificate to your computer, you could also use a browser to inspect the chain of trust:
Next steps
We’ve now got SaltStack creating SSL certificates to secure internal network traffic. To take it further, you could:
- Use an intermediate certificate on
caand store the root certificate on an air-gapped computer. - Use Salt to bootstrap a Hashicorp Vault certificate authority, creating certificates for clients on demand.
- Use Salt to generate client certificates to access services, e.g. securely authenticate with a Consul cluster.